
~Mini Tips and Hints~ You are visitor
Hey guys, I am running out of ideas (as amazing as it seems)! Do you want to be a guest columnist? You might get a little mini out of it!
Library ideas and woodworking tips
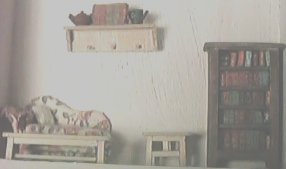
This is a collection of some of the pieces I have been making in quarter inch. They are early, so some things are a little rough, but they are all mine;)!
Libraries can be fun to make (and can easily be converted into bookstores if that is your bent.). They are nice spaces to make cozy and a very good place to individualize your dollhouse. I have made items in quarter inch, but these things can easily be converted to other scales. Your two magic tools are your ruler and your eyes.
Some miniaturists are intimidated by the very idea of building their own furniture. I know I was! Therefore it was a natural step for me to start building furniture in 1/4" scale, right...? Much laughter inserted here. Oddly enough, I had less trouble with quarter inch than I ever had with one inch. First of all, I can use thinner wood, which is easily cut with a *sharp* exacto knife. Here are a few tricks I have learned through my adventures in woodworking.
"Which way do they want me to cut this?". This was my first question. Oddly enough most of my sources didn't tell me which way the pattern piece should be placed on the wood. If this practice happened in a clothing pattern, the designer would be whipped to death with their own tape measure. Grain is important in fabric, and it is important in woodworking. Yet they "expect" you to just know. Sigh! I found it helpful to look at pieces of furniture around the house and base my decisions on that. If you look carefully at basswood, you will see that there are lines running down the board. This is the grain. I usually cut with the grain when I am making a supporting element of a bookshelf. This is the "strong" direction. If you cut the other direction, the wood will have a wobble, and depending on how thin you have cut it, it may just break and crumble.
When you have to cut anything with a curve, always make your "across grain" cuts first. This prevents the wood from happily splitting down too far and ruining your effort.
Your ruler is your best friend. When you want to make an item, and you have to make a long cut along a straight line so that the piece is a perfect rectangle, you don't want to find that one end is 1/32 of an inch out on one end! If you are doing a real sized piece, this might not cause you too many problems, but the smaller you make your work, the more that error is magnified! The rule is "measure twice, cut once", but unless you are an expert woodworker, you should err on the safe side and measure until you are absolutely sure that your measure is perfect.
"Which side of the line do I cut on?". An artform in itself. There isn't a solid rule here. What I do is measure again, and see where "x" distance is. If it falls within the line, then I cut the line on the inside of the piece. If it falls right on the line, I consider that an "outside" cut. The biggest trick is to be consistent with your ruler (if you measure from the edge of a ruler mark, always measure the same way). If you aren't consistent, you will get drift errors and you will be frustrated and ruin lots of wood.
"I need some chair legs, but when I cut them out of stock, I can never seem to get two legs exactly the same length!". I thought I was being clever the first time I tried to cut out several lengths of board by using a strip moulding that was the right width for legs. You know what I found? This doesn't work. You sit and measure, thinking you have the right size, but because your pencil mark was just "this" much off, you find that all your legs are different lengths! To counteract such a heinous turn of events, I proceeded in this manner: I took my flat board of basswood, and measured a length that was right for my legs. I drew my line and cut out the rectangle across the grain. I then could measure chair leg widths with the grain and just cut those out. All my legs were perfectly the same length.
Keep track of what you are doing with your blade. If you cut with the blade tilted, your cut will be on an angle. This isn't very good if you need that edge nice and square! Dull blades can start tilting because they can't get through the fibers of the wood, so also watch that. I have heard that even with the best carving knife, you can only get two and one half hours out of it at best before sharpening needs to occur. You can sharpen exacto blades, check with a tool shop to see what you would need. Sometimes you get "feathering". This is when the knife doesn't go through the wood quite right and leaves little splinters on the end. Do not sand these, but cut them off with a pair of scissors. This is especially critical in quarter inch as any sanding will round edges that you may not have wanted rounded. In any scale, you have to judge your wood. Hardwoods in bigger than quarter inch will have to be cut out with a coping saw -- exacto blades are just not very efficient in wood thicker than 1/32" thick.
Remember, safety first. Make sure you aren't abusing your knife (pushing on it with great force instead of dragging it along to cut the fibres as it was intended), or aiming it directly at some of the fleshy bits of your existence. Remember exacto knifes are just this side of scalpels, and should be treated with respect.
Libraries
Now armed with your woodworking lesson, lets build a library! There are books at the library that have patterns, or you can design your own. Bookcases are easy to do. They are nothing more than a series of rectangles. Just pick a case you like, measure and figure out how it was put together. Real size patterns can help with this. If you want a period case, just find the requisite decorations. Victorian, for instance, there are fretwork items you can cut apart (oriental fans), or in the case of quarter inch you can ut apart fretwork meant for one inch pieces. It is just a case (excuse the pun) of finding what works.
Perhaps you need a small bookshelf like I made. Well, there wasn't much too it, I designed and built it in about an hour. All there is is two rectangles glued together, with braces that I cut out of wood. For a pattern I simply found out how wide I needed them to be, drew a pattern on a piece of paper, cut out inside the lines and traced out onto my wood. I did this twice. I carefully cut those out, and glued to the sides. The knobs were merely thin slices of 1/32" wood.
The books. There are a number of ways to make books. A fast way to make books is to take a strip of wood (calibrated in the scale you are working with -- in quarter inch, for example, the books were 1/4inch tall and 3/16" wide. Of course, make the books fit your own shelf). The books were then scored, painted and "antiqued" with a burnt umber wash. This hint was courtesy of Pam! The loose books were nothing more than sections of wood that were covered with paper. It also is nice to put a little gold detailing on the spines. Larger books can be made with sections of wood, or you can build books with real pages. These are handy if you want printing in them, or use computer printed pages. You can take pictures of book spines, photocopy them (to reduce and to take away the shiny) and paste them to a block of wood as well.
Tables: craft stores often carry wood cutouts in various shapes. If you take two of those pieces (one smaller than the other), you have a table top. Add wood strips or toothpicks for legs and the table is ready to be finished.
Chairs: If you want a really simple upholstered armchair, all you need is some woodblocks or foamcore. Most chairs can be developed out of rectangle and square pieces. Arms can be made from round dowelling. To upholster, you can use double sided foam tape (for one inch), or right to the wood with quarter inch. Upholstering is a matter of cutting, trimming and gluing the fabric so there is no bulk. A library book on the subject might be most helpful.
Some of the idio, um, I mean "patrons" at our local library want a capuccino bar. Where this would be very wrong at a real library (I have seen what they do to the pages when they have the books at home, can you imagine what would happen if they didn't have to worry about being charged for the damage?), at a pretend library there would be no spilling hazards. Make cups from cardstock/wooden dowels/ wire, paper and paint. Dowels can be drilled to appear to look right, but if you just want them as decoration on the shelf you just built then all you have to do is treat the top so there is an illusion. Coffee pots can be made from beads, electronic parts and a little imagination. Oreo cookies can be made by painting posterboard on two sides and punching out circles.
What else can you put into a library? Anything you want! Check out previous tips and hints for even more ideas, and heck, while your at it, make up some of your own!:) Have fun!
...And that is it. If you have an idea for a tips and hints section, please write to me. So far I have done a few reader's ideas, perhaps you can be next! Please also check the archives , as there could be an old theme that might jive with one of your own current projects!:) Also, if you have a good tip hint that you would like to share, don't hesitate to give me a note about it, You could become famous... For older tips, check out the Mini Tip archive. Back to home
...And that is it. If you have an idea for a tips and hints section, please write to me. So far I have done a few reader's ideas, perhaps you can be next! Please also check the archives , as there could be an old theme that might jive with one of your own current projects!:) Also, if you have a good tip hint that you would like to share, don't hesitate to give me a note about it, You could become famous...

For older tips, check out the Mini Tip archive.